This new module turns to Architectural Visualisation, or #ArchViz as I see it has become these days. Seems like social media is having an effect here too, but not least for the amount of inspirational images appearing under similar hashtags daily.
Refamiliarisation
Firstly, I have a confession… this is not my first time using 3DSMax!
I last used this software to produce images for my BArch submission in 2009. Notable projects I used this for can be found here:
- Chetham’s School of Music
- Museo Diocesano
However, that was some considerable time ago. There are many advancements, and some considerable changes to 3DSMax, notably with materials and rendering. I have also forgotten much of how I produced this earlier work, in what I find is a complicated and sometimes frustrating piece of software. This part is true now as it was then!
Instead of using this project as an introductory course as it might have been intended, I have used my time to relearn the software and develop a deeper understanding of certain aspects of the visualisation process.
HDRI Environment
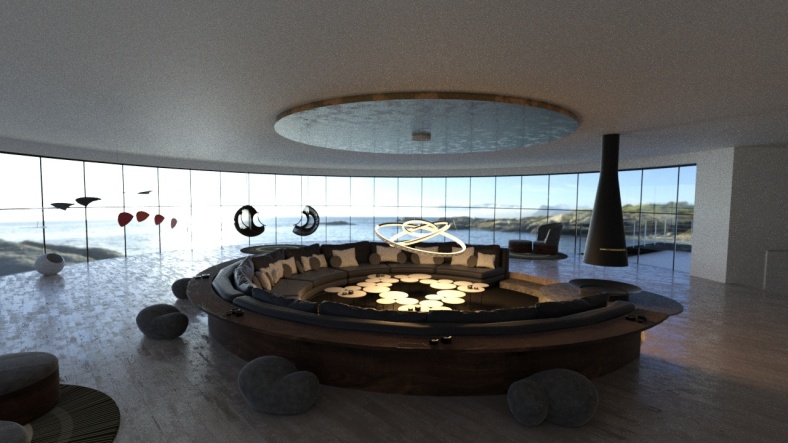
The assignment brief presented me with an empty circular room, with access from the rear projecting towards a 270° panorama window.
First of all, I imported the model, set up a couple of overview cameras and experimented with a number of HDRI images downloaded from the website https://hdrihaven.com/.


Design Concept
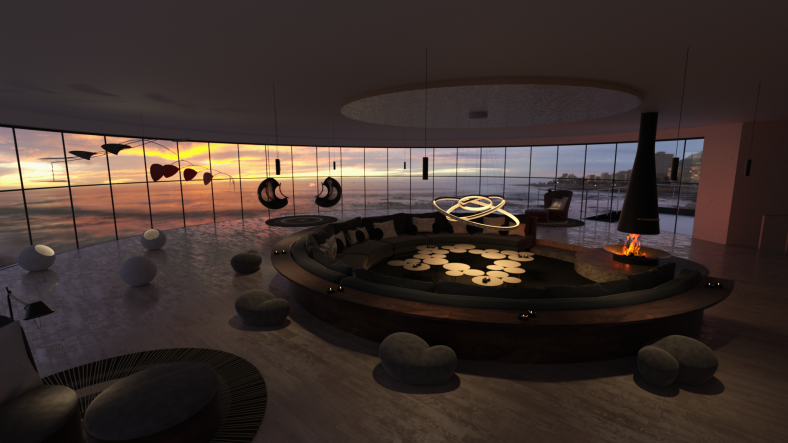
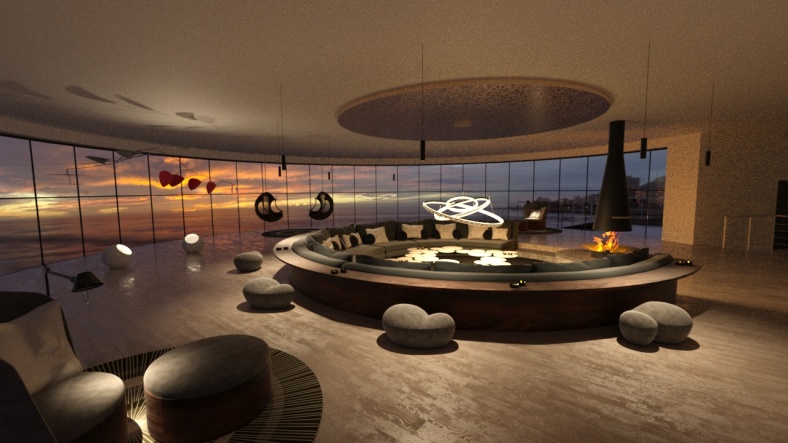
A Pinterest board was created for circular interiors, used to gather inspiration. From there, I sketched out a concept based on the idea of a circular sunken ‘conversation pit’, with a central chandelier. Other elements would effectively be placed in orbit around the chandelier. The hanging mobiles of Alexander Calder were an additional inspiration. Hanging chairs and a suspended fireplace were placed around the outside of the space to increase the sense of suspension, and so not to interrupt the view outwards. The movement of the Calder mobile, hanging chairs and crackling fire would also help give an extra dynamic to the space in reality, though how much of that could translate to a still image would be limited.
The idea for a private entertainment space on the seafront with a sunset view was therefore conceived, and the sketch below helped form a plan for the following work.
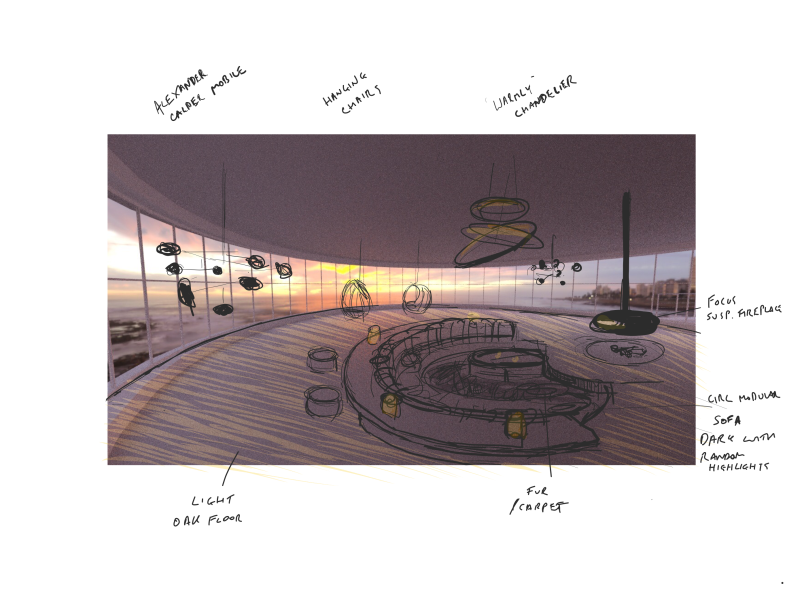
Concept Sketch
Day 1 – Geometry
One of the most difficult tasks was finding available models to realise the design concept. My final image uses a mixture of models imported from manufacturers resources, and other models found at 3D Warehouse. Other elements, such as raised flooring, carpentry, and pendant lamps, have been modelled directly in 3DSMax.
The greatest challenge was finding a ready made sofa to fit the scale of the room. In retrospect, it would have been best to model this in Max and keep the polygon count down. Concerned I would use all of my time modelling a sofa, what I did was to import a generic model I found on 3D warehouse, and scale this up slightly to the desired size. Unfortunately, I lost track of the relative scale and it wasn’t until later I realised this sofa was gigantic in real world size! The problem was partly solved by duplicating cushions to create a realistic depth, but more unfortunately more cushions meant more polygons. Again, something which would have been better to model rather than import. In the final result there is unfortunately a slight (if subtly disguised!) mismatch between sizes of the sofa and coffee tables. In future, I will be sure to plan a space paying more attention to scale, and not to rely on Max in the design phase.
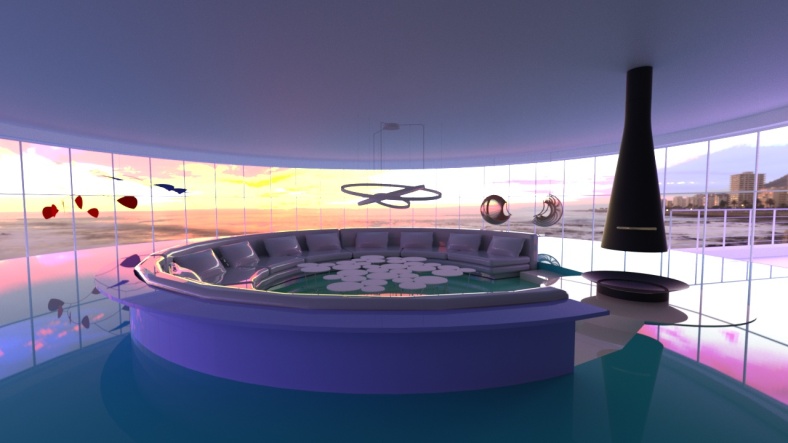
The test render at the end of this first phase looked like this:
Day 2 – Materials
The second day of work was focused towards texturing the scene. Each material was previewed in session using active render, with a higher exposure value than seen below from the overview camera. This is the test render taken at the end of that day, without lighting:
The key materials to introduce here were wooden textures for the floor (oak) and carpentry (walnut). I invested good time here in getting a desired amount of reflection and texture. The grey upholstery texture was also important, created using a blend of bitmaps and noise texturing to create variation in tone. This was based upon the manufacturers own catalogue. The result of that was pleasing enough that I decided to extend the overview to include an additional reading area in the bottom left corner, so that could be seen more close up.
The rug is a great visual feature in the final image. This was imported directly with a texture, using a model from 3D Warehouse. However, this did make the model a little heavy and slower to render. I combatted that by organising the rug (and all other respective models) in layers which could easily be turned on and off when not required. Again, I could have had better control here with what I was importing.
I would have liked to include fur textures in this model, but this will take some further mastering of material editing.
Day 3 – lighting
In reality, this was not a full day or a task totally separated from the others. But the final day’s work was focused upon getting a satisfactory balance for the maximum visual impact.
After adding all of the lights I required, I saw that the image had lost some of the visual impact from some of the earlier test renders. Using the light lister and exposure controls, I adjusted it back to where I thought it was best to capture that magical moment at sunset where there is balance between natural and artificial lighting. Experiments to reduce the amount of blue hue given off by sky image were conducted, but without satisfactory results. This I understand could be adjusted in Photoshop if desired, but for the purpose of this submission I have only included renderings direct from 3DSMax.
A test render with daylighting:
After adding artificial lighting, but now becoming overlit for the sunset to have any visual impact:
Playing with fire
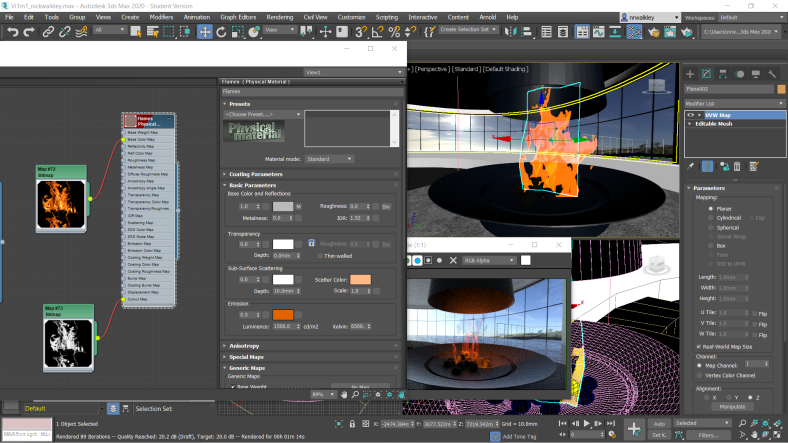
The material I am perhaps most satisfied with was the flame in the fireplace. With help from this tutorial, I saw how it was possible to create this effect. The warmth radiating from the fireplace is a key element in creating the sense of warmth and cosiness in the space.
The flame geometry comprises two planes, converted to meshes and deformed. The flame texture comprises two maps; one for the base colour and a black/white cutout map created in photoshop by removing saturation, and strengthening the brightness/contrast. The material was then given an emission value with a red colour so that the fire would emit warm light into the room.
A similar process was used to create a flame for the candles in the room, with a much smaller emission value.
Learning curves
The most obvious problem with this model is that the polygon count is high for the hardware I am using. At the point reached, working with this model is now difficult and slow.
The problem was circumnavigated by using layers, and turning off heavy objects when not needed. However, this is not ideal and obtaining satisfactory quality final renderings also takes significantly more time.
This model totalled a polygon count of 1389636.
As an experiment I set the main image to render for the longest time I could. I stopped it after 18 hours and 3 minutes. For a 1920×1080 image the quality reached 31.1dB after 4572 iterations.
Arnold vs ART
Initially, I thought to start learning how to use Arnold. Whilst he sounded very friendly, the experience I had from the start was anything but! For this project I decided to stick with ART to keep things simple whilst I gain a better understanding of how to combine different maps and settings. The material editor has changed significantly since earlier versions of Max, and one I spent considerable time getting to learn in tutorials over the past two weeks.
VRay is unfortunately out of my reach just now, though I understand it is used widely in architectural visualisation. I am guessing many of the concepts will be similar in using Arnold, so perhaps VRay is not worth investing in just yet.
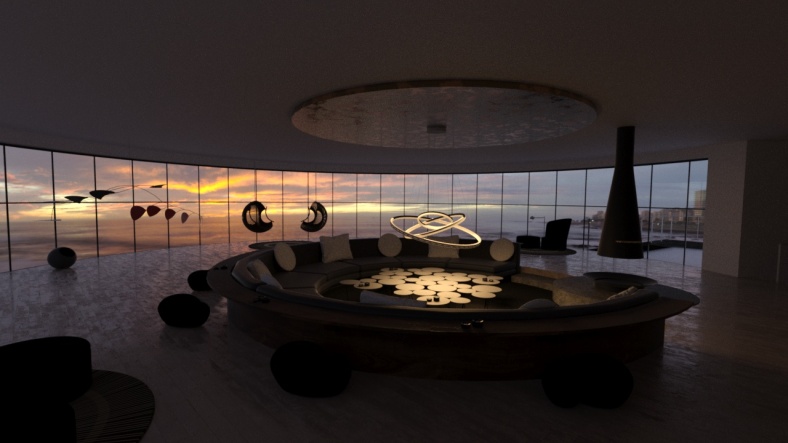
Here are the final renders, after some minimal photoshop tweaking and enhancement: